Nextcloud 14 und nginx einrichten
Kurze Einleitung
In diesem Tutorial möchte ich euch näher bringen, wie ihr die Nextcloud auf eurem eigenem root Server mit nginx und dem Linux Betriebssystem Debian installiert, einrichtet und darauf zugreifen könnt.
Während ich das Tutorial schreibe, werde ich die Cloud nebenbei aufsetzten, so ist gewährleistet, dass diese auch funktionsfähig ist.
Vorraussetzten werde ich die bereits erfolgreiche Konfiguration von nginx, php7.0-fpm, mysql, sowie Debian 9 (stretch)
Falls ihr damit nicht vertraut seid, schaut euch meine Tutorials dazu an.
Und los gehts.
1.) Die Installation der Nextcloud
Die Daten holen wir uns direkt von dem Entwickler.
wget https://download.nextcloud.com/server/releases/nextcloud-14.0.0.zip
unzip nextcloud-14.0.0.zip
Nun die entpackte Datei ins Webverzeichnis verschieben und die Rechte ändern.
mv nextcloud /var/www/
rm -r nextcloud-14.0.0.zip
chown -R www-data:www-data /var/www/nextcloud
2.) Datenbank für die Nextcloud erstellen
Nun erstellen wir die Datenbank für Nextcloud, auf die sie später zugreifen wird.
mysql -u root -p
MariaDB [(none)]> create database nextcloud;
Query OK, 1 row affected (0.00 sec)
MariaDB [(none)]> create user nextcloudadmin@localhost identified by 'bitteändern';
Query OK, 0 rows affected (0.00 sec)
MariaDB [(none)]> grant all privileges on nextcloud.* to nextcloudadmin@localhost identified by 'bitteändern'-> ;
Query OK, 0 rows affected (0.00 sec)
MariaDB [(none)]> flush privileges;
Query OK, 0 rows affected (0.00 sec)
MariaDB [(none)]> exit;
3.) SSL Zertifikat für die Cloud Domain beschaffen
Wenn noch kein Certbot usw. vorhanden ist, schaut bitte hier vorbei, da wird genau beschrieben, wie man sich ein kostenloses SSL-Zertifikat besorgt.
Ansonsten verwendet ihr folgendes:
certbot certonly --webroot -w /var/www/nextcloud -d cloud.meinedomain.de -d www.cloud.meinedomain,de
Ihr findet die keys dann unter folgendem Verzeichnis /etc/letsencrypt/live/cloud.meinedomain.de
4.) Nginx einrichten und für die Nextcloud konfigurieren
Falls euch bis hierher nginx ein Fremdwort ist, einmal klicken und ihr bekommt eine Einführung zu dem Thema. Bitte beachtet besonders die Einstellung von nginx und SSL, eine SSL-Verbindung wird von Nextcloud vorausgesetzt!
Zuerst erstellen wir eine neue config für die Cloud, welche ihr in /etc/nginx/sites-available/ erstellen müsst.
touch cloud.config
nano cloud.config
Verwendet folgene Einstellungen:
upstream php-handler {
#server 127.0.0.1:9000;
server unix:/var/run/php/php7.0-fpm.sock;
}
server {
listen 80;
server_name cloud.englert.one;
location ^~ /.well-known/acme-challenge/ {
root /var/www/html/nextcloud/;
}
# enforce https
location / {
return 301 https://$server_name$request_uri;
}
}
server {
listen 443 ssl http2;
listen [::]:443 ssl http2;
server_name cloud.englert.one;
ssl_certificate /etc/letsencrypt/live/cloud.englert.one/fullchain.pem;
ssl_certificate_key /etc/letsencrypt/live/cloud.englert.one/privkey.pem;
add_header Strict-Transport-Security "max-age=31536000; require_onceSubDomains" always;
# Add headers to serve security related headers
# Before enabling Strict-Transport-Security headers please read into this
# topic first.
# add_header Strict-Transport-Security "max-age=15768000;
# require_onceSubDomains; preload;";
#
# WARNING: Only add the preload option once you read about
# the consequences in https://hstspreload.org/. This option
# will add the domain to a hardcoded list that is shipped
# in all major browsers and getting removed from this list
# could take several months.
add_header X-Content-Type-Options nosniff;
add_header X-XSS-Protection "1; mode=block";
add_header X-Robots-Tag none;
add_header X-Download-Options noopen;
add_header X-Permitted-Cross-Domain-Policies none;
# Path to the root of your installation
root /var/www/html/nextcloud/;
location = /robots.txt {
allow all;
log_not_found off;
access_log off;
}
# The following 2 rules are only needed for the user_webfinger app.
# Uncomment it if you're planning to use this app.
#rewrite ^/.well-known/host-meta /public.php?service=host-meta last;
#rewrite ^/.well-known/host-meta.json /public.php?service=host-meta-json
# last;
location = /.well-known/carddav {
return 301 $scheme://$host/remote.php/dav;
}
location = /.well-known/caldav {
return 301 $scheme://$host/remote.php/dav;
}
# set max upload size
client_max_body_size 512M;
fastcgi_buffers 64 4K;
# Enable gzip but do not remove ETag headers
gzip on;
gzip_vary on;
gzip_comp_level 4;
gzip_min_length 256;
gzip_proxied expired no-cache no-store private no_last_modified no_etag auth;
gzip_types application/atom+xml application/javascript application/json application/ld+json appl$
# Uncomment if your server is build with the ngx_pagespeed module
# This module is currently not supported.
#pagespeed off;
location / {
rewrite ^ /index.php$uri;
}
location ~ ^/(?:build|tests|config|lib|3rdparty|templates|data)/ {
deny all;
}
location ~ ^/(?:\.|autotest|occ|issue|indie|db_|console) {
deny all;
}
location ~ ^/(?:index|remote|public|cron|core/ajax/update|status|ocs/v[12]|updater/.+|ocs-provid$
fastcgi_split_path_info ^(.+\.php)(/.*)$;
require_once fastcgi_params;
fastcgi_param SCRIPT_FILENAME $document_root$fastcgi_script_name;
fastcgi_param PATH_INFO $fastcgi_path_info;
fastcgi_param HTTPS on;
#Avoid sending the security headers twice
fastcgi_param modHeadersAvailable true;
fastcgi_param front_controller_active true;
fastcgi_pass php-handler;
fastcgi_intercept_errors on;
fastcgi_request_buffering off;
}
location ~ ^/(?:updater|ocs-provider)(?:$|/) {
try_files $uri/ =404;
index index.php;
}
# Adding the cache control header for js and css files
# Make sure it is BELOW the PHP block
location ~ \.(?:css|js|woff|svg|gif)$ {
try_files $uri /index.php$uri$is_args$args;
add_header Cache-Control "public, max-age=15778463";
# Add headers to serve security related headers (It is intended to
# have those duplicated to the ones above)
# Before enabling Strict-Transport-Security headers please read into
# this topic first.
# add_header Strict-Transport-Security "max-age=15768000; require_onceSubDomains; preload;";
#
# WARNING: Only add the preload option once you read about
# the consequences in https://hstspreload.org/. This option
# will add the domain to a hardcoded list that is shipped
# in all major browsers and getting removed from this list
# could take several months.
add_header X-Content-Type-Options nosniff;
add_header X-XSS-Protection "1; mode=block";
add_header X-Robots-Tag none;
add_header X-Download-Options noopen;
add_header X-Permitted-Cross-Domain-Policies none;
# Optional: Don't log access to assets
access_log off;
}
location ~ \.(?:png|html|ttf|ico|jpg|jpeg)$ {
try_files $uri /index.php$uri$is_args$args;
# Optional: Don't log access to other assets
access_log off;
}
}
Vergesst nicht, die erstellte Config auch zu verlinken:
$ ln -s ../sites-available/cloud.config cloud.meinedomain.de
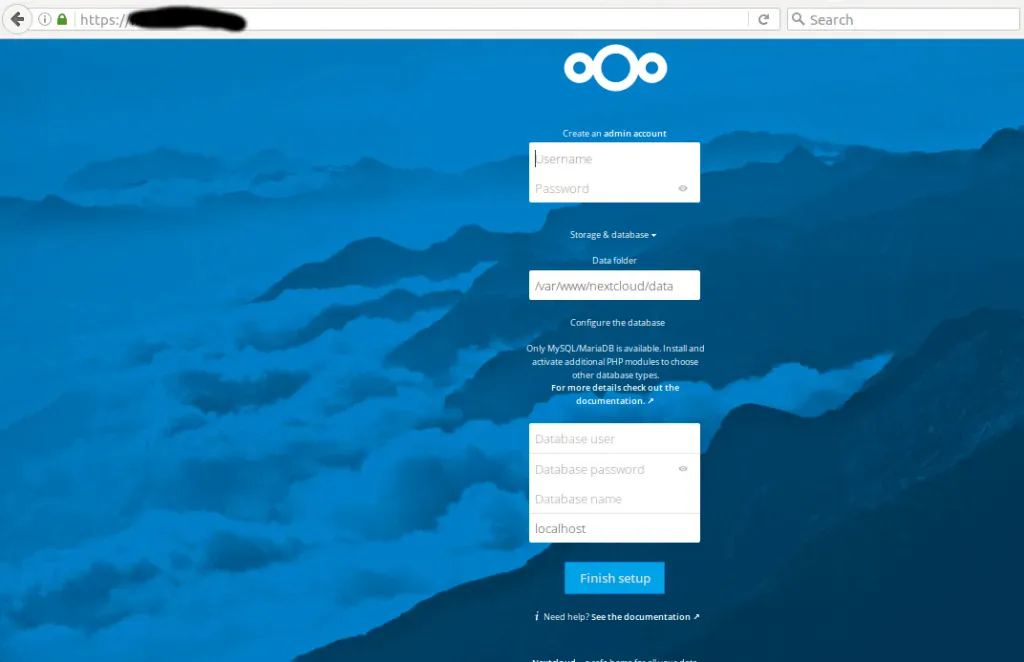
5.) Im Webinterface einloggen
Nun müsst ihr nur noch eine Cloud im Browser öffnen und sie final einrichten. Das Ganze sieht dann wie auf dem Bild aus.
